用Python写脚本,小程序可谓非常方便,但它需要有特定的python环境才能运行,因此如果你想在别的电脑上运行时就会出现许多问题,就算已经安装了Python,但版本可能相差较大,且相关的依赖库没有安装,同样不能正常运行。那有没有一种工具能把我们写的代码和依赖库以及编译环境打包到一起呢?答案是肯定的,Pyinstaller就是一款不错的工具,可以一键把你的代码打包成exe文件。下面就先来聊一聊pyinstaller的使用方法。
一、用Pyinstaller打包python代码 1. 安装Pyinstaller 安装过程非常简单,在命令行中运行:
即可完成安装。
2. 打包代码 我写了一段简单的代码作为例子,为了更清晰地演示打包过程,我将main()函数写在了单独的文件中,并将mylib.py作为一个库引入。
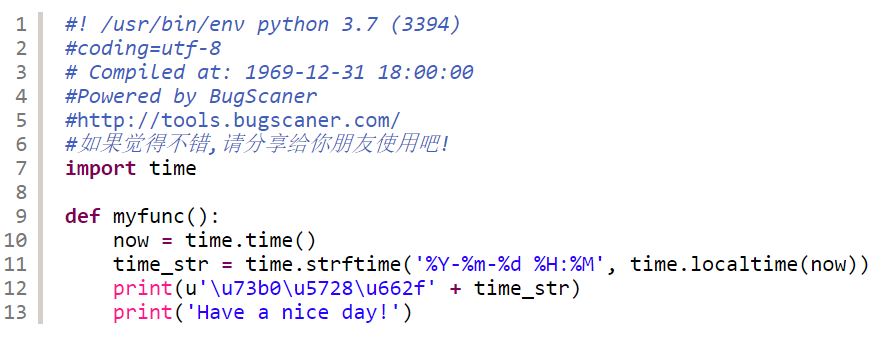
1 2 3 4 5 6 7 8 9 10 11 import timedef myfunc (): now = time.time() time_str = time.strftime("%Y-%m-%d %H:%M" , time.localtime(now)) print ('现在是' + time_str) print ("Have a nice day!" )
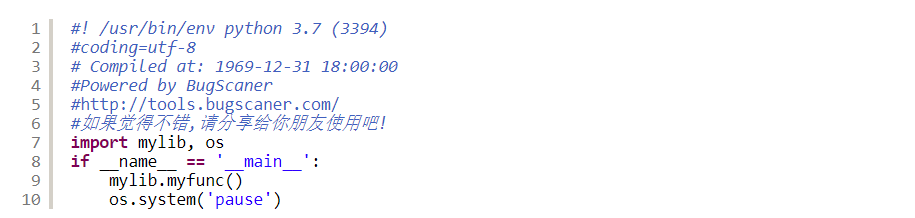
1 2 3 4 5 6 7 8 9 import mylibimport osif __name__ == "__main__" : mylib.myfunc() os.system('pause' )
这时只需要在命令行中运行:
1 pyinstaller.exe -F yourcode.py
即可。会看到一下输出:
1
2
3
4
5
6
7
8
9
10
11
12
13
14
15
16
17
18
19
20
21
22
23
24
25
26
27
28
29
30
31
32
33
34
35
36
37
38
39
40
41
42
43
44
45
PS D:\文档\tmp\test> pyinstaller.exe -F main.py580 INFO: PyInstaller: 3.6 582 INFO: Python: 3.7 .3 585 INFO: Platform: Windows-10-10 .0.18362 -SP0 592 INFO: wrote D:\文档\tmp\test\main.spec596 INFO: UPX is not available.611 INFO: Extending PYTHONPATH with paths['D:\\文档\\tmp\\test' , 'D:\\文档\\tmp\\test' ] 612 INFO: checking Analysis614 INFO: Building Analysis because Analysis-00 .toc is non existent614 INFO: Initializing module dependency graph...620 INFO: Caching module graph hooks...657 INFO: Analyzing base_library.zip ...13893 INFO: Caching module dependency graph...14161 INFO: running Analysis Analysis-00 .toc14233 INFO: Adding Microsoft.Windows.Common-Controls to dependent assemblies of final executable required by d:\programfiles\python\python.exe 15748 INFO: Analyzing D:\文档\tmp\test\main.py15751 INFO: Processing module hooks...15752 INFO: Loading module hook "hook-encodings.py" ...16003 INFO: Loading module hook "hook-pydoc.py" ...16011 INFO: Loading module hook "hook-xml.py" ...16916 INFO: Looking for ctypes DLLs16917 INFO: Analyzing run-time hooks ...16925 INFO: Looking for dynamic libraries17373 INFO: Looking for eggs17374 INFO: Using Python library d:\programfiles\python\python37.dll17374 INFO: Found binding redirects:[] 17377 INFO: Warnings written to D:\文档\tmp\test\build\main\warn-main .txt17447 INFO: Graph cross-reference written to D:\文档\tmp\test\build\main\xref-main .html17506 INFO: checking PYZ17507 INFO: Building PYZ because PYZ-00 .toc is non existent17508 INFO: Building PYZ (ZlibArchive) D:\文档\tmp\test\build\main\PYZ-00 .pyz18600 INFO: Building PYZ (ZlibArchive) D:\文档\tmp\test\build\main\PYZ-00 .pyz completed successfully.18637 INFO: checking PKG18639 INFO: Building PKG because PKG-00 .toc is non existent18640 INFO: Building PKG (CArchive) PKG-00 .pkg22329 INFO: Building PKG (CArchive) PKG-00 .pkg completed successfully.22332 INFO: Bootloader d:\programfiles\python\lib\site-packages \PyInstaller\bootloader\Windows-64bit \run.exe22334 INFO: checking EXE22335 INFO: Building EXE because EXE-00 .toc is non existent22336 INFO: Building EXE from EXE-00 .toc22416 INFO: Appending archive to EXE D:\文档\tmp\test\dist\main.exe22641 INFO: Building EXE from EXE-00 .toc completed successfully.
你将在当前文件夹下看到如下文件:
1
2
3
4
5
6
7
8
9
10
11
12
13
14
15
16
17
18
D:. │ main.py │ main.spec │ mylib.py ├─build │ └─main │ Analysis-00 .toc │ base_library.zip │ EXE-00 .toc │ main.exe.manifest │ PKG-00 .pkg │ PKG-00 .toc │ PYZ-00 .pyz │ PYZ-00 .toc │ warn-main .txt │ xref-main .html └─dist main.exe
其中dist文件夹中就是生成的exe文件。
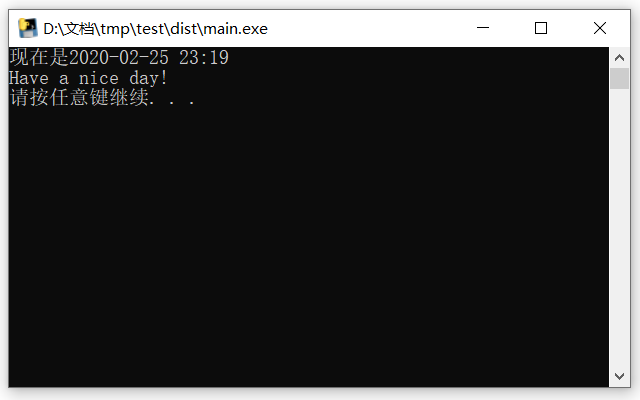
直接双击exe文件就能正常运行了。
但这篇文章的重点并不是介绍如何使用pyinstaller。此时,我又在思考,如此简单的打包过程究竟安全吗?打包成的exe文件会不会轻而易举地被反编译?
查阅了相关资料后发现,确实可能。
二、pyinstaller 的反编译过程 1. 下载并使用pyinstxtractor解包 我们第一步采用的工具是pyinstxtractor.py,可以将pyinstaller 生成的exe文件解包成pyc文件。
项目地址:
https://sourceforge.net/projects/pyinstallerextractor/
或者点此链接🔗 下载
之后把这个文件复制到待解包exe同级目录下,运行如下命令:
1 python pyinstxtractor.py xx.exe
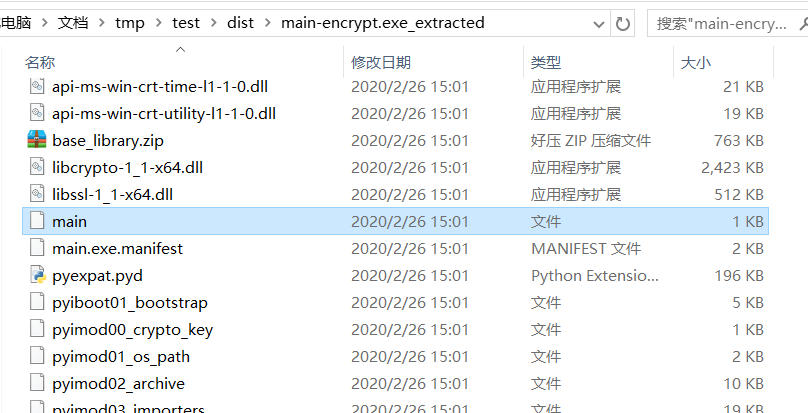
运行后生成xx.exe_extracted文件夹 ,里面有一堆dll ,pyd等文件,我们需要注意的是里面有一个xxx.exe.manifest文件,xxx可能与你的exe文件名不同,但这才是它的真实名字。然后找到一个叫xxx的没有后缀名的文件 ,它其实就是你之前打包的那个.py文件对应的pyc文件。
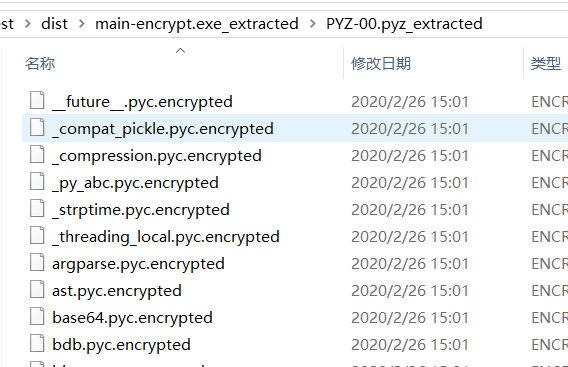
我们还注意到此目录下还有一个PYZ-00.pyz_extracted文件夹,里面都是引入的依赖库 ,当然,我们自己写的mylib.py也在其中,它也是我们反编译的对象。
2. 反编译pyc文件 找到了pyc文件,下面自然就是对它进行解密了。pyc其实是python程序执行过程中产生的缓存文件,我们直接运行python代码时也会看到。对于这种格式的反编译是比较简单的,网上有许多工具,甚至还有很多在线工具。这里为了方便,我就采用了一款在线工具。附上链接🔗
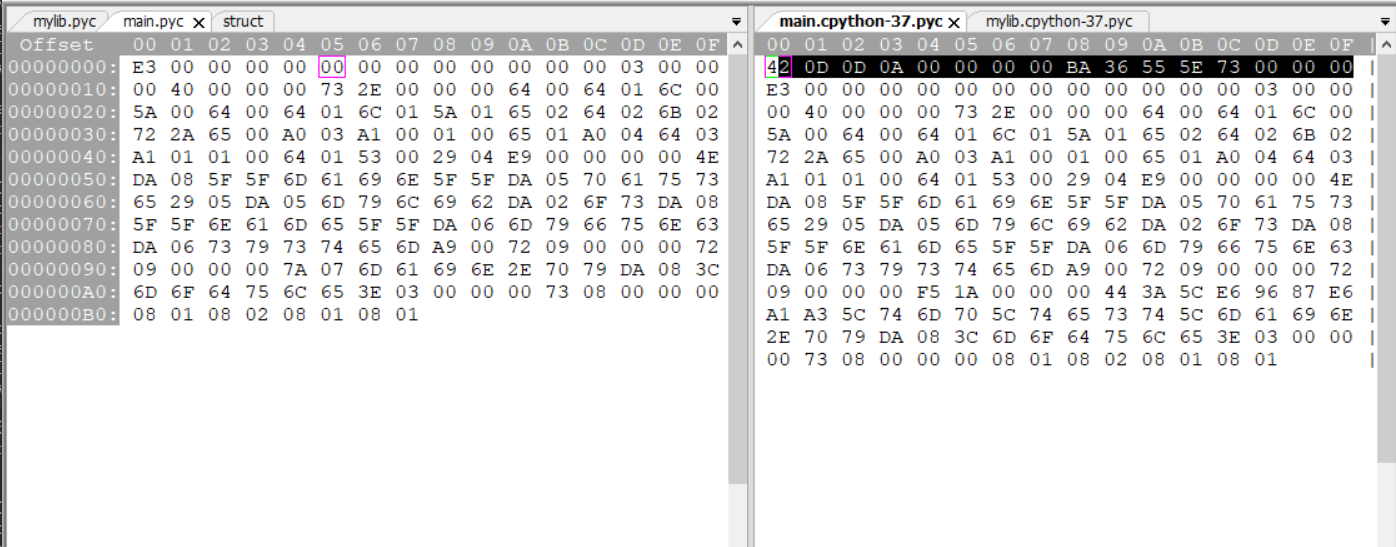
但直接将我们找到的pyc文件上传会发现无法反编译。原因是什么呢?我们用十六进制编辑器 (大家网上搜就行,我这里用的是wxMEdit)打开这个文件,与之前直接运行py文件生成的pyc文件比较。
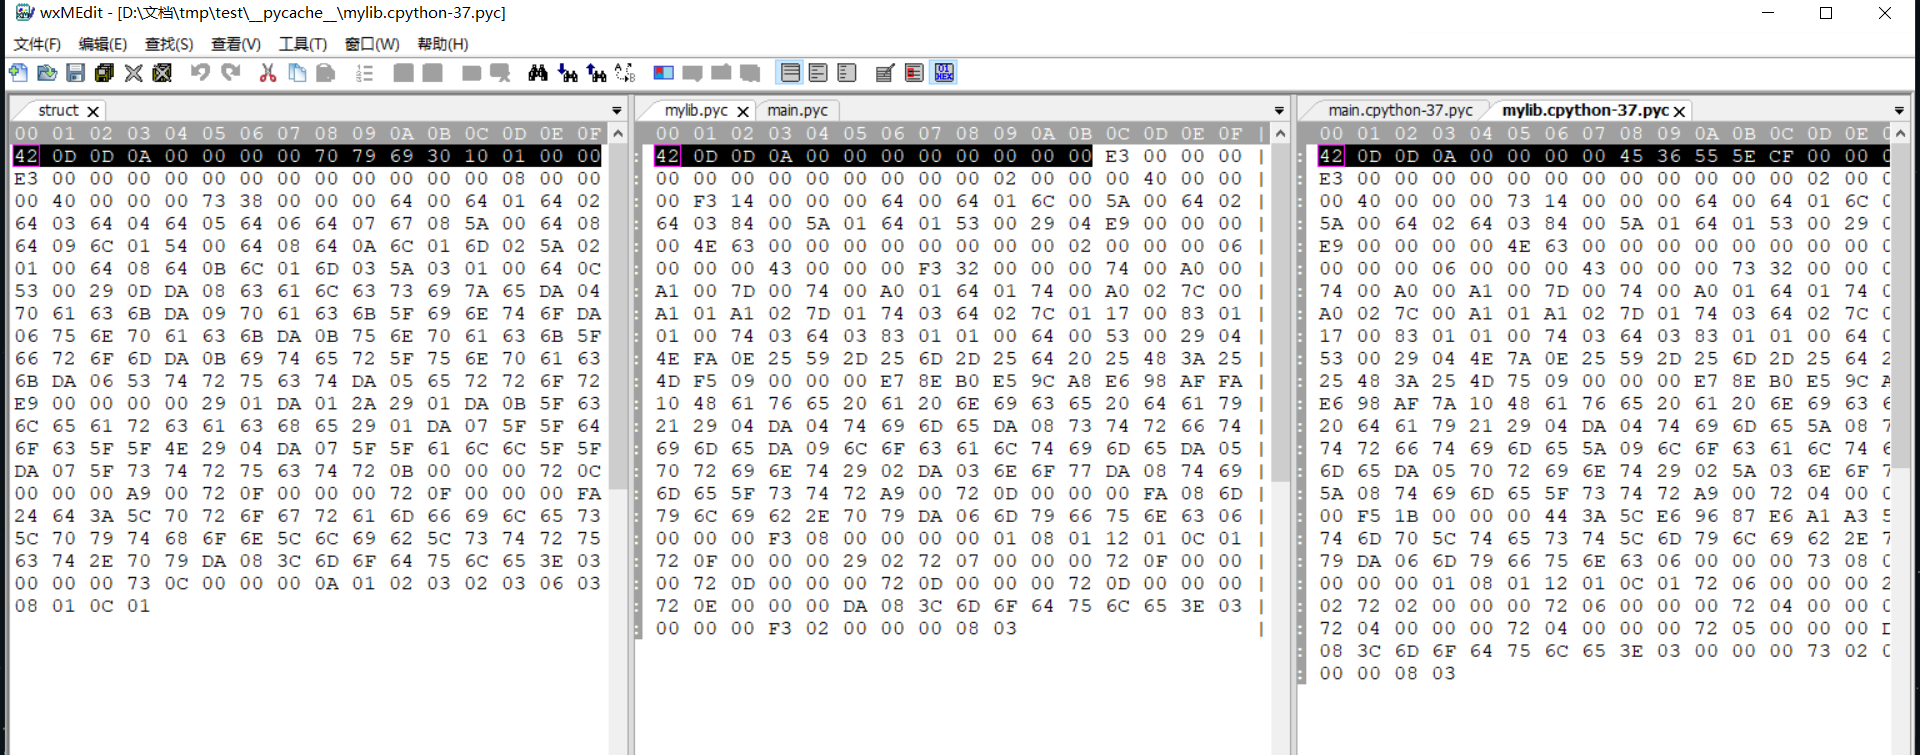
我先来看一下main.pyc的区别,左边是我们解包出来的,右边是运行生成的。
发现唯一的差别就是少了第一行16个字节 (叫做 magic number 表示python的版本和编译时间),那我们把它加上是不是就能正常解析了呢?确实是这样,但没有原始pyc文件怎么办?我们再到xx.exe_extracted文件夹里找一找。会发现有一个叫struct的文件,我们给他加上后缀.pyc反编译试试。发现成功反编译出如下内容:
这就说明它的 magic number 是正确的,那我们只要把它的前16个字节复制过去不就行了?我们再来试试,成了!main.py中的内容被成功反编译出来了。
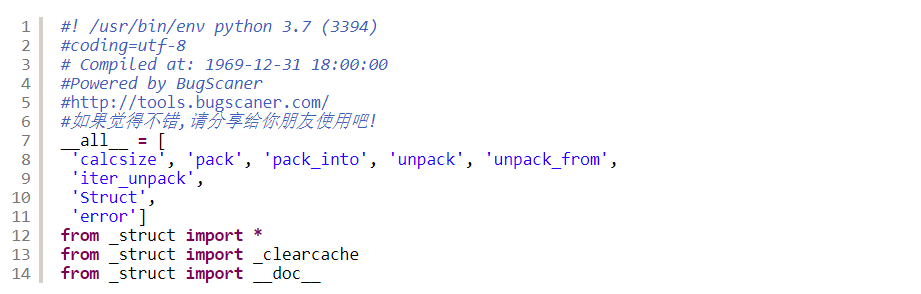
下面同理也能反编译出mylib.py等依赖库中的内容,不过值得注意 的是,网上很多教程都没有提到依赖库的pyc文件缺少的字节数与主程序的不同!!!
struct文件 | 中:解包出的mylib.pyc | 右:正确的pyc文件
我们发现它不是缺少了16个字节,而是中间少了4个字节!!!
那么,我们只需要把struct头部的16个字节 覆盖掉mylib.pyc的前12个字节 。
改好之后再进行反编译。
反编译成功! 不过中文字符被解析成了Unicode编码,可以再使用相应工具转换。
可以看到,通过pyinstaller打包的exe,还是能被较为容易地反编译的。那么有加密打包的方法吗?其实pyinstaller本身就是支持加密的,下面就来说一说如何加密打包。(这也是个天坑。。。)
三、使用pyinstaller加密打包exe 其实只要在打包时加个key参数就能加密,
1 pyinstaller.exe -F --key 123456 xxx.py
不过需要依赖pycrypto包,而python一般是不自带这个包的。因此需要我们手动安装。
1. 安装pycrypto包 原本安装过程应该很简单,通过pip就能安装。
不过安装过程好像要调用VS编译器编译,这就造成了莫名其妙的问题,如果你在安装过程中没有报错,那么恭喜你,你可以跳过这部分了。
我在网上找了很多解决方法都没效,最后终于在StackOverflow上找到了一篇回答,完美解决了这个问题。原答案地址:https://stackoverflow.com/a/46921479/12954728
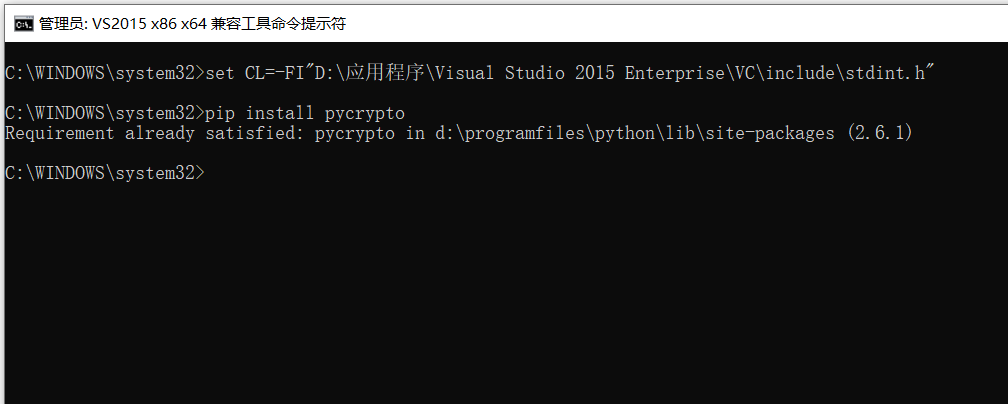
解决方法如下,前提是你电脑上安装了Visual studio
以我的vs2015为例
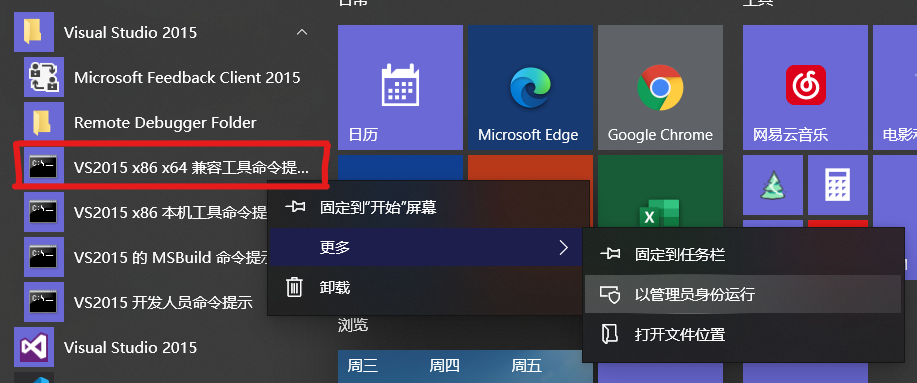
在开始菜单中找到VS文件夹,用管理员身份运行这个”兼容工具命令提示符“
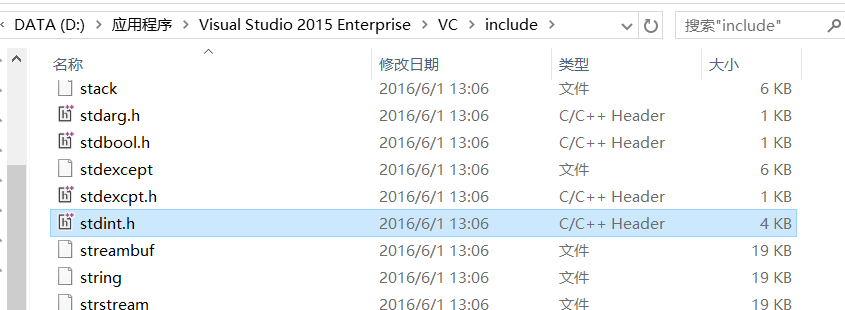
在你的VS安装目录下找到stdint.h这个文件,最好用everything搜索一下
输入set CL=-FI"你的路径\stdint.h"设置环境变量
然后再执行pip install pycrypto就能成功安装了
2. 使用pyinstaller加密打包 现在执行如下命令就能加密打包了。key后面为密钥可以随便输。
1 pyinstaller.exe -F --key 123456 xxx.py
3. 反编译测试 那么我们再来测试一下加密打包的exe还能不能被反编译。
再次执行pyinstxtractor.py
1
2
3
4
5
6
7
8
9
10
11
12
13
14
15
16
17
18
19
20
21
22
23
24
25
PS > python pyinstxtractor.py .\main-encrypt .exe import imp [*] Processing .\main-encrypt .exe [*] Pyinstaller version: 2.1 + [*] Python version: 37 [*] Length of package: 5787283 bytes [*] Found 63 files in CArchive [*] Beginning extraction...please standby [+] Possible entry point: pyiboot01_bootstrap [+] Possible entry point: main [*] Found 136 files in PYZ archive [!] Error: Failed to decompress Crypto, probably encrypted. Extracting as is. [!] Error: Failed to decompress Crypto.Cipher, probably encrypted. Extracting as is. [!] Error: Failed to decompress __future__, probably encrypted. Extracting as is. [!] Error: Failed to decompress _compat_pickle, probably encrypted. Extracting as is. [!] Error: Failed to decompress argparse, probably encrypted. Extracting as is. [!] Error: Failed to decompress ast, probably encrypted. Extracting as is. [!] Error: Failed to decompress base64, probably encrypted. Extracting as is. [!] Error: Failed to decompress bdb, probably encrypted. Extracting as is. [!] Error: Failed to decompress bisect, probably encrypted. Extracting as is. [!] Error: Failed to decompress bz2, probably encrypted. Extracting as is. [!] Error: Failed to decompress calendar, probably encrypted. Extracting as is. [!] Error: Failed to decompress cmd, probably encrypted. Extracting as is. [!] Error: Failed to decompress code, probably encrypted. Extracting as is. [!] Error: Failed to decompress codeop, probably encrypted. Extracting as is.
这次下面输出了一长串Error,看来确实是被加密了。
我们再来看一看文件夹。
main-encrypt.exe_extracted文件夹里似乎没什么变化,但PYZ-00.pyz_extracted文件夹里全是加密文件,应该是无法反编译了
不过对外层文件夹中的main文件进行同样操作后依然是可以反编译出源码的。
看来这个加密只针对依赖库 。
四、总结 如果你不希望别人得到你的源码,建议将你程序的入口函数写在一个单独的文件 里,并采用加密方式 打包exe。这样的话,就算别人尝试反编译也只能得到你的入口函数。